Posted by: Mauro 6 years, 9 months ago
This is the cheapest solution I found to monitor my home electricity production and consumption.
First of all, thanks to the awesome project OpenEnergyMonitor. There are several ways you can choose when adopting this solution. Ways that span from a complete product and online service, to a more DIY approach: a simple Arduino shield, for which you'll have to solder connectors and components yourself. I chose the latter.
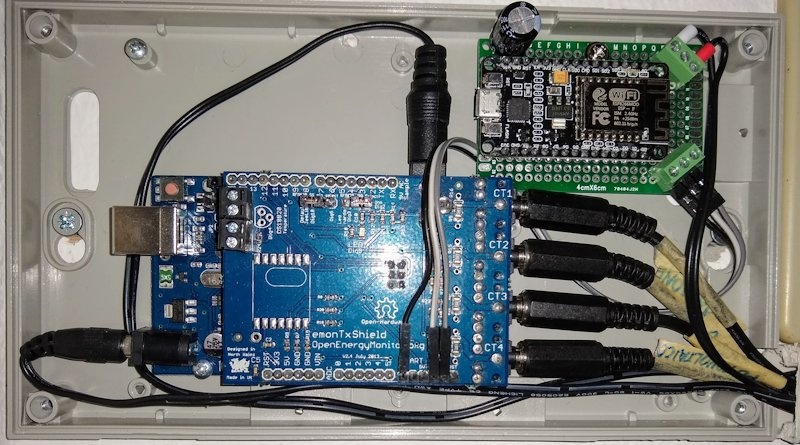
Hardware: OpenenEnergyMonitor Arduino shield, Arduino Uno, ESP8266 (nodemcu), 100A max clip-on current sensors, AC-AC 220V to 9V adapter (used as phase and voltage reference when calculating real power)
Software stack: an MQTT client on ESP8266, and an MQTT-broker, Node-RED, Influxdb, Grafana on a Linux server.
Let's look at the data flow:
- Arduino samples current and voltage sensors, and calculates up to four real power readings, using software provided by OpenEnergyMonitor
- Arduino sends the readings to an ESP8266 over a serial connection, every 30 to 60 seconds.
- ESP8266 is connected to your home wi-fi, packages the power readings into MQTT messages, and sends them to an MQTT broker running on a server, possibly over the Internet
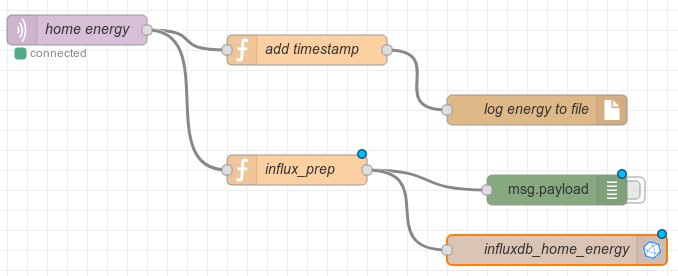
- Node-RED is running on the same server, subscribes to the relevant topic by means of an MQTT input node, and starts receiving messages
- Node-RED manipulates the messages, e.g. adding a timestamp, logs the messages to a local file (as an alternative storage), and uses an output node to inject data into InfluxDB
- InfluxDB, a specialized database for time-series samples, stores the power readings for as long as you instruct it to
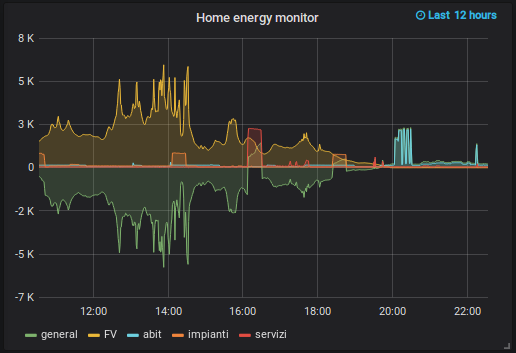
- Finally Grafana, querying InfluxDB, generates live beautiful graphs, that can be viewed from PCs and mobile devices
This solution can be easily adapted and extended to collect data from sensors of any kind.
There are clearly two sides in the overall setup, connected by MQTT: the home devices (Arduino Uno + OpenEnergyMonitor EmonTX shield + NodeMCU) and the server side (a GNU/Linux server with Mosquitto, NodeRED, InfluxDB and Grafana).
I'll start with the server setup, and finish with the Arduino part.
GNU/Linux server setup
MQTT over SSL
There is a fantastic article, which you can follow step by step, on how to setup a secure Mosquitto server (MQTT broker) on DigitalOcean.
By following this tutorial, if you have a registered domain or host name on a cloud server, you will get a valid SSL certificate, using the free service offered by Let's Encrypt. This free certificate would expire quite often; however, it is supposed to be hooked to an automatic cron script, which periodically takes care of certificate renewal: certbot.
Let's Encrypt and certbot
Setup steps in brief:
sudo add-apt-repository ppa:certbot/certbot
sudo apt-get update
sudo apt-get install certbot
sudo service nginx stop
sudo certbot certonly --standalone --preferred-challenges http-01 -d <your.fqdn.host.name>
Nginx or apache need to be stopped, because certbot needs to bind to tcp port 80 for the challenge to be successful (Let's Encrypt needs proof that you are really running on that fully qualified domain name, before issuing the certificate!)
A successful run of the last shell command should output something like:
Saving debug log to /var/log/letsencrypt/letsencrypt.log
Plugins selected: Authenticator standalone, Installer None
Obtaining a new certificate
Performing the following challenges:
http-01 challenge for <your.fqdn.host.name>
Waiting for verification...
Cleaning up challenges

IMPORTANT NOTES:
- Congratulations! Your certificate and chain have been saved at:
  /etc/letsencrypt/live/<your.fqdn.host.name>/fullchain.pem
  Your key file has been saved at:
  /etc/letsencrypt/live/<your.fqdn.host.name>/privkey.pem
  Your cert will expire on 2018-xx-xx. To obtain a new or tweaked
  version of this certificate in the future, simply run certbot
  again. To non-interactively renew *all* of your certificates, run
  "certbot renew"
- If you like Certbot, please consider supporting our work by:
  Donating to ISRG / Let's Encrypt:   https://letsencrypt.org/donate
  Donating to EFF:                    https://eff.org/donate-le
You may now restart the http service stopped earlier:
sudo service nginx start
And, most importantly, automate certificate renewal:
sudo crontab -e
[add the line:] 15 3 * * * certbot renew --noninteractive --post-hook "systemctl restart mosquitto
Mosquitto
sudo apt-get install mosquitto mosquitto-clients
Create users and set their password with mosquitto_passwd (-c creates a new file, overwriting existing: to be used the first time).
sudo mosquitto_passwd -c /etc/mosquitto/passwd <mqtt_username>
<secretpwd>
sudo mosquitto_passwd /etc/mosquitto/passwd <mqtt_username2>
<secretpwd2>
Edit mosquitto configuration file /etc/mosquitto/conf.d/default.conf to require user authentication:
allow_anonymous false
password_file /etc/mosquitto/passwd
And restart the service for the changes to take effect:
sudo systemctl restart mosquitto
It's time to do a quick test to check the broker is working properly, with clients connecting locally, before adding the ssl part and communicating over the big Internet.
On the server, run a client that subscribes to a topic on a shell, and a client that publishes a message (same topic) on another shell:
mosquitto_sub -h localhost -t "test" -u "<mqtt_username>" -P "<secretpwd>"
mosquitto_pub -h localhost -t "test" -m "hello world" -u "<mqtt_username>" -P "<secretpwd>"
The subscriber should receive the "hello world" message.
Edit /etc/mosquitto/conf.d/default.conf again, so that includes the following rows:
listener 1883 localhost

listener 8883
certfile /etc/letsencrypt/live/<your.fqdn.host.name>/cert.pem
cafile /etc/letsencrypt/live/<your.fqdn.host.name>/chain.pem
keyfile /etc/letsencrypt/live/<your.fqdn.host.name>/privkey.pem
Restart mosquitto and open local firewall:
sudo systemctl restart mosquitto
sudo ufw allow 8883
Don't forget to open your hosting/cloud firewall as well (in my case, you'd do this using DreamCompute Dashboard - security groups).
Finally you are ready to test your MQTTS broker over the Internet. For example, run the subscribing client locally on the server, and the publisher remotely.
mosquitto_sub -h <your.fqdn.host.name> -t test -p 8883 \
-u "<mqtt_username>" -P "<secretpwd>" --capath /etc/ssl/certs/
mosquitto_pub -h <your.fqdn.host.name> -t "test" -m "hello again" -p 8883 \
-u "<mqtt_username>" -P "<secretpwd>" --capath /etc/ssl/certs
Node-red and Nginx
A Node-red instance is very handy for passing and manipulating messages between different sources and destinations, represented by "input nodes" and "output nodes".
You can visually connect nodes, apply transform functions, and easily activate debugging. All of this from your browser.
DigitalOcean comes to the rescue again with the tutorial we need.
You start by installing nodejs and npm, which in turn will install node-red:
sudo apt-get install nodejs-legacy
node -v
sudo apt-get install npm
sudo npm install -g --unsafe-perm node-red node-red-admi
"node -v" is useful to check nodejs is actually installed, and outputs its version (4.2.6 for Ubuntu 16.04).
Node-red needs now to become a regular systemd service, and you do this by creating the configuration file /etc/systemd/system/node-red.service, with the following content:
[Unit]
Description=Node-RED
After=syslog.target network.target

[Service]
ExecStart=/usr/local/bin/node-red-pi --max-old-space-size=128 -v
Restart=on-failure
KillSignal=SIGINT

# log output to syslog as 'node-red'
SyslogIdentifier=node-red
StandardOutput=syslog

# non-root user to run as
WorkingDirectory=/home/nodered/
User=nodered
Group=nodered

[Install]
WantedBy=multi-user.target
Since it will run as user nodered, this user must be created:
sudo adduser nodered
You should now be able to start and stop the node-red service, which by default listens on tcp port 1880.
sudo systemctl enable node-red
sudo systemctl start node-red
sudo systemctl stop node-red
If you run node-red on a cloud vm, it can be a good idea to expose it through a reverse proxy, using https, under a location of your choice: for example "https://<your.fqdn.host.name>/nodered/". Configuring nginx to do this is not difficult, and for the ssl part you can reuse the same letsencrypt certificate from the mosquitto setup!
Use a (new) config file in /etc/nginx/sites-available, and add the relevant parts:
server {
        listen 80;
        listen 443 ssl http2;
        server_name <your.fqdn.host.name>;

        ssl_certificate /etc/letsencrypt/live/<your.fqdn.host.name>/fullchain.pem;
        ssl_certificate_key /etc/letsencrypt/live/<your.fqdn.host.name>/privkey.pem;
        ssl_protocols TLSv1 TLSv1.1 TLSv1.2;
[...]

        location /nodered/ {
                if ($scheme = http) {
                    return 301 https://$server_name$request_uri;
                }
                proxy_pass http://localhost:1880;
                proxy_set_header Host $host;
                proxy_set_header X-Real-IP $remote_addr;
                proxy_http_version 1.1;
                proxy_set_header Upgrade $http_upgrade;
                proxy_set_header Connection "upgrade";
        }
[...]
}
Prepare the admin password hash to access node-red web interface:
node-red-admin hash-pw
Password: <secret-admin-pwd>
$2a$08$Oknh.........................X/M/oJqL1ylW
Then, paste the hash in node-red config file, adjusting a few other parameters, at /home/nodered/.node-red/settings.js
module.exports = {
    // the tcp port that the Node-RED web server is listening on
    uiPort: process.env.PORT || 1880,

    // By default, the Node-RED UI accepts connections on all IPv4 interfaces.
    // The following property can be used to listen on a specific interface. For
    // example, the following would only allow connections from the local machine.
    uiHost: "127.0.0.1",
[...]
    httpRoot: '/nodered',
[...]
    adminAuth: {
        type: "credentials",
        users: [{
            username: "admin",
            password: "$2a$08$0knh.......................X/M/oJqL1ylW",
            permissions: "*"
        }]
    },
[...]
Restart node-red:
sudo systemctl restart node-red
Enable nginx configuration by creating a symlink in sites-enabled to the file in sites-available:
cd /etc/nginx/sites-enabled
/etc/nginx/sites-enabled>sudo ln -s ../sites-available/<site-config> <site-config>
Finally restart nginx:
sudo systemctl restart nginx
Time to test if all this work was worth the pain: point your browser to http://<your.fqdn.host.name>/nodered
The browser should be redirected to https, and node-red login be presented.
InfluxDB
InfluxDB is a database engine specialized for time-series data. You can download it directly from Influxdata. Prebuilt binary packages for several platforms are available (Linux deb, rpm, tgz, docker; Windows; OS X). For the curious, sources are on github. Download and installation of the deb package is very easy:
wget https://dl.influxdata.com/influxdb/releases/influxdb_1.5.3_amd64.deb
sudo dpkg -i influxdb_1.5.3_amd64.deb
Check the configuration file in /etc/influxdb/influxdb.conf.
InfluxDB is managed as a systemd service in recent Ubuntu releases.
If a service restart is needed, or to check service status:
sudo systemctl restart influxdb

sudo systemctl status influxdb
Create a database and a retention policy for it, using influxdb cli "influx":
$ influx
> CREATE DATABASE home
> SHOW DATABASES
name: databases
name
----
_internal
home
> CREATE RETENTION POLICY "two_years" ON home DURATION 104w REPLICATION 1 DEFAULT
Alternatively, you may use the http API:
curl -XPOST "http://localhost:8086/query" --data-urlencode "q=CREATE DATABASE home"
The "home" database is ready to be used by node-red, once we install the inlfluxdb nodes:
sudo su nodered
cd /home/nodered/.node-red
npm install node-red-contrib-influxdb
You should now be able to create a nodered flow, using an mqtt input node, an influxdb output node, and a function node to manipulate and adapt the content of the messages. Additionally, I decided to log incoming mqtt messages to file (another function node adds the timestamp to the message - note that adding a timestamp is not needed for influxdb: if the data you are injecting is "live", influxdb will create the timestamp automatically, using current date and time).
Grafana
todo
Home setup
Wiring
Arduino Uno and NodeMCU are both powered by a DC adapter (8-9 V, Arduino left barrel connector and NodeMCU top-right wire connector).
EmonTxShield is connected to the four clip-on current sensors (3.5 mm jack, to the right), and additionally to the AC-AC adapter (9Vac, top barrel connector).
The serial connection between Arduino and NodeMCU makes use of three female-male jumper wires (GND, Tx, Rx)
Arduino UNO (with EmonTX shield) sketch
The following sketch is taken from OpenEnergyMonitor GitHub examples, with just a few changes.
First, calibration parameters need to be adjusted to obtain readings close to zero when no load is consuming electrical power.
With accuracy in mind, another change I made is taking four subsequent readings before sending mean values over serial: in this way it is possible to increase the sampling rate without increasing the update frequency (which remains in the order of 40-50 secs).
/*
  EmonTx CT123 Voltage Serial Only example

  Part of the openenergymonitor.org project
  Licence: GNU GPL V3

  Author: Trystan Lea
*/

#include "EmonLib.h"

// Create  instances for each CT channel
EnergyMonitor ct1,ct2,ct3,ct4;

// On-board emonTx LED
const int LEDpin = 9;

void setup()
{
  Serial.begin(9600);
  // while (!Serial) {}
  // wait for serial port to connect. Needed for Leonardo only

  //Serial.println("emonTX Shield CT1234 Voltage Serial");
  //Serial.println("OpenEnergyMonitor.org");

  // Calibration factor = CT ratio / burden resistance =
  //                      (100A / 0.05A) / 33 Ohms = 60.606
  ct1.current(1, 60.606);
  ct2.current(2, 60.606);
  ct3.current(3, 60.606);
  ct4.current(4, 60.606);

  // (ADC input, calibration, phase_shift)
  ct1.voltage(0, 243.0, 1.7);
  ct2.voltage(0, 243.0, 1.7);
  ct3.voltage(0, 243.0, 1.7);
  ct4.voltage(0, 243.0, 1.7);

  // Setup indicator LED
  pinMode(LEDpin, OUTPUT);
}

void loop()
{
  float wPower[] = {0.0, 0.0, 0.0, 0.0};
  float Vrms = 0.0;
  for (int i=0; i<4; i++) {
    digitalWrite(LEDpin,HIGH);
    // Calculate all. No.of crossings, time-out
    ct1.calcVI(20,2000);
    ct2.calcVI(20,2000);
    ct3.calcVI(20,2000);
    ct4.calcVI(20,2000);
    digitalWrite(LEDpin,LOW);
    wPower[0] += -ct1.realPower;
    wPower[1] += ct2.realPower;
    wPower[2] += -ct3.realPower;
    wPower[3] += ct4.realPower;
    Vrms += ct1.Vrms;
    delay(5000);
  }

  // Transmit power readings over serial
  Serial.print("ct1:");
  Serial.print(wPower[0]/4.0); // general
  Serial.print(",ct2:");
  Serial.print(wPower[1]/4.0); // apartment
  Serial.print(",ct3:");
  Serial.print(wPower[2]/4.0); // thermal power station (heat pump)
  Serial.print(",ct4:");
  Serial.print(wPower[3]/4.0); // photovoltaic
  Serial.print(",vrms:");
  Serial.print(Vrms/4.0);
  Serial.println();

  // Available properties:
  //   ct1.realPower, ct1.apparentPower, ct1.powerFactor,
  //   ct1.Irms and ct1.Vrms
}
NodeMCU (Arduino IDE) sketch
Here the catch was not trying to use the hardware serial pins, which are used by the usb interface of NodeMCU. Use a SoftwareSerial interface instead: here pin 12 and 14 were used as tx and rx. It is probably sufficient to connect pin 14 only, as no message is actually sent by NodeMCU back to Arduino.
#include <ESP8266WiFi.h>Share on Twitter Share on Facebook
#include <WiFiClient.h>
#include <PubSubClient.h>
#include <SoftwareSerial.h>
#define ssid "xxxx" // WiFi SSID
#define password "pppppppp" // WiFi password
#define clientId "emon1"
#define mqttTopic "energy"
#define mqttPwd "mqpwdmqpwd"
#define mqttUser "mqtt_user"
WiFiClientSecure espClient;
PubSubClient mclient(espClient);
SoftwareSerial swSerial(14,12); // (rx-pin, tx-pin)
String data = "";
boolean gotData;
char buff[80];
int mqtt_pub(const char *ddd) {
if (mclient.connected()) {
// Serial.print("About to send mqtt msg: ");
// Serial.println(ddd);
mclient.publish(mqttTopic, ddd);
}
else {
mclient.connect(clientId, mqttUser, mqttPwd);
mclient.publish(mqttTopic, ddd);
}
}
void setup() {
Serial.begin(9600);
swSerial.begin(9600);
WiFi.begin (ssid, password);
// Wait for wifi connection
while (WiFi.status() != WL_CONNECTED) {
delay(500);
Serial.print (".");
}
// WiFi connection is OK
Serial.println("");
Serial.print("Connected to "); Serial.println(ssid);
Serial.print("IP address: "); Serial.println(WiFi.localIP());
mclient.setServer("example.com", 8883);
if (mclient.connect(clientId, mqttUser, mqttPwd)) {
Serial.println("MQTT client connected to server");
}
}
void loop() {
mclient.loop();
gotData = false;
if (swSerial.available()) {
// Could check for string integrity here
// example string: ct1:0.00,ct2:-0.00,ct3:-0.00,ct4:0.00,vrms:3.62
data = swSerial.readStringUntil('\n');
data.trim();
if (data.length() > 0 && data.startsWith("ct1:")) gotData = true;
}
if (gotData) {
data.toCharArray(buff, sizeof(buff));
mqtt_pub(buff);
}
delay(500);
}
Recent Posts
- harman/kardon HK 620 no speaker output
- Volvo XC60 cannot play (some) MP3 tracks
- Solarmax Inverters Data to MQTT
- Monitor your FRITZ!Box Internet bandwidth usage using lots of free software: Python, Redis, Raspbian, Mosquitto, Node-RED, InfluxDB, Grafana
- IoT garden irrigation for less than 30€
Archive
2021
2020
- October (1)
2019
- April (1)
2018
Categories
- arduino (4)
- IoT (6)
- open hardware (1)
- open source (4)
- networking (2)
- Cisco (1)
- audio (1)
Tags
- openenergymonitor grafana influxdb nodered mqtt mosquitto arduino esp8266 (1)
- grafana influxdb nodered mqtt mosquitto (1)
Authors
- Mauro (10)
Comments
opal.hong 5 years, 8 months ago
Its like you read my mind! You seem to know so much about
Link | Replythis, like you wrote the book in it or something.
I think that you can do with a few pics to drive the message home
a little bit, but other than that, this is
excellent blog. A great read. I will certainly be back.
New Comment